Showing posts with label Tag. Show all posts

Tuesday, October 30, 2018

SOS 378: Witching Hour

This week, we are celebrating The Witching Hour at Shopping Our Stash, thanks to our hostess, Donna!

I love Halloween.  Here is a tag made for the occasion:


Supplies:

  • The focal images were recently sent by our hostess, Donna.  Thank you!
  • Paper by Authentique, passed on by a coworker.  The bats/webs are on one side, the plaid on the other.  
  • The black banner in the middle was a scrap from a Martha Stewart Halloween pad from last year.
  • I made the half-rosettes and I am so proud of them!  Well, the top one looks a little wonky in the image, but IRL they are fine.  They are pretty small.  In case you have never tried to do this, the way I do it is to just score paper at even intervals, then I always use hot glue to hold it together.
  • Ribbon from my stash 
  • Viva Paper Pearls in Cream
  • Stickles in Black Diamond
  • I tried using on of Andrea/Snapping Monsters stitchy stamp, but dang me: I accidentally cut the rubber too this on this and I need to re-mount it.  I was being stubborn on this project and tried to "wing it" except I was far to clumsy.  I'll go fix the stamp now!  
Thank you for visiting.  I hope you guys have some crafty Halloween time.  If you don't need any last minute Halloween cards, remember that Day of the Dead is November 1st... maybe you could do some spooky crafts revolving around that!

See you at Shopping Our Stash.

Thursday, August 16, 2018

Too old... tag

I've used this saying before and I'll use it again-- I guess this is where the bulk of my friends are at this point in life!


Supplies:
  • Tag base made from a scrap of regular 65 lb. cardstock 
  • a ripped piece of paper served as a mask across the middle as I blended some Carved Pumpkin DOx across the tag
  • Heidi Swapp woodgrain stamp inked with Candied Apple DOx and spritzed then stamped across tag
  • Edged blended with DI in Black Soot
  • Saying stamped with an Amy Tangerine set and a small Target set in Ranger Archival in Jet Black
  • Yarns and twines from my scrap jar
  • The metal studs are stickers by Recollections, I believe, though the packaging is long gone
This tag went on a bottle of rum for our neighbor whose birthday we celebrated two nights ago.

I'll share this tag at Watercooler Wednesday:

Tuesday, July 24, 2018

SOS: Get kraft-y!

Hello!

This week at Shopping Our Stash, Donna is our hostess and she has chosen the theme Get Kraft-y!

This is the kraft-y tag I came up with:


I must say I did not like this tag during it's creation, and I even had a restless night one night imagining how I could dismantle it and use the pieces.  In my dream, I tore the girls and I was upset, so I got up the next morning and followed through with the project.

Supplies:

  • Ranger tag inked with Vintage Photo and Walnut Stain DI
  • The main visible layer is a piece of kraft paper inked using a Ranger gel plate and Picked Raspberry Distress Paint using a stencil that I made when I first got my Cricut Explore Air 2.  I also inked this with Walnut Stain DI and distressed at the edges.
  • The layer behind that layer is a piece of patterned paper from a DCWV succulent pad/kit.
  • I stuck a few pieces of kraft and kraft-esque ephemera  in there, including one of Tim's old adage tickets and a piece from a Crate Paper pack.  There is also a wildflower from Tim's Wildflowers 2 pack that I had cut from kraft in the past.  I "painted" it using DOx in Frayed Burlap and Picked Raspberry
  • Tim's Paper Dolls are sitting atop a strip of scrap kraft. 
  • One of Tim's fluted stars was added with a touch of Ranger Mushroom alcohol ink and some Stickles in silver.
  • Stickles in silver added to the shoes, too...
  • The quote was cut from an old book and adhered with Distress Collage Medium in Vintage.
  • The yarn is my fave-- and this particular strand is super-stashy: I used it last year to tie up a plant (a sunflower?) that was hanging into the lawn, then it lived on the fence all year until I cut it down and set it in my stash jar.
Hope you have the time to join us over at SOS!  For inspiration, visit the SOS design team.


Tuesday, July 10, 2018

SOS: Feed Me!

This week at Shopping Our Stash Donna had asked us to create something inspired by this phrase, "feed me!"

Here are my creations:
is


Supplies:
  • Paper entirely from my stash box. Wish I could give names, but the best I can do is Heidi Swapp and Teresa Collins...
  • Pre-cut circle die
  • Wood-look letters from way back... Packaging long gone
  • The milk and cookies stamp was purchased recently from Tuesday Morning then never used... until now.  Cookie colored with a Rexel Derwent watercolor pencil.
  • Blue enamel dots by Prima; black rhinestones from Micheal's in the dollar bins.
  • Twine from my stash.
Hungry for more? Join us at SOS this week!

Thursday, July 5, 2018

Floral watercolored tag

Here's a nice bright one:


Supplies:

  • Ranger tag coated with Teresa Collins modeling pasted through Tim Holtz's Stripes stencil
  • When dry, roses, leaves, then background painted with Kane Davenport watercolors.
  • Roses accented with Finetec Pearlcolors in Sterling Silver
  • Sentiment written on black cardstock with a Signo white pen
  • Black and white baker's twine from stash
  • Black Liquitex gesso rubbed at edges.
I'd like to share this at the following challenges:

She had ridden out storms

I spent some time working on this tag this Thursday morning:

Note the burnt ends.

Note the floral pattern on her dress.

Note the twinkle-toes...


Supplies:
  • Ranger tag coated with Teresa Collins modeling paste through Tim Holtz's Stripes stencil
  • When dry, tag sprayed with Lindy's Stamp Gang spray in Ethereal Emerald
  • Old Basic Grey patterned paper cut to fit then edged with Walnut Stain Distress Paint
  • Recollections brads painted with Walnut Stain Distress Paint and affixed
  • Pine branch dies by Tim Holtz/Sizzix cut from kraft and Core-dinations metallic kraft-core.
  • Deer charm (with loop cut off) added with a hot-glue gun.  The charm came last winter in a goodie bag from The Funkie Junkie Boutique.
  • The lady is from Tim's Paper Dolls.  I inked her with Ranger Adirondack Alcohol Ink in Mushroom but rubbed it off of her face and shoes-- didn't want spots there.  What was cool, though, was how the speckled alcohol ink brought out the floral pattern of her skirt!
  • Stickles added to her toes... and somehow this improves the entire project.
  • Old seam binding cut and I was wondering if it was a poly-blend, so I tried to burn it to abate fraying, but this was apparently 100% cotton, so I just burnt the edges.  Will have to remember this as it left a cool dark edge.
  • The quote was snipped from an old book and adhered with Distress Collage Mediums in both Matte and Vintage.
I'd love to share thus with the following challenges:

Thursday, May 24, 2018

Dino-mite tag

Made this for my daughter's birthday:


Supplies:
  • Distress tag base inked with Peacock Feathers DI
  • Main panel made by stamping Tim's Scribbles stamp onto some cheap watercolor paper and heat embossing with Recollections in Snow (plain white)
  • Paper then sprinkled with Lindy's Stamp Gang Magicals and sprayed; adhered to tag
  • The fabulous dino came in a die+ stamp set by Recollections... hadn't used out until this project! I inked the dino with Worn Lipstick DI 2x, then inked it with Distress Embossing Ink and heat embossed with purple EP by Stampendous.
  • Then the dino was inked with Peacock Feathers DI
  • "Dynamite" was inked with Ranger Letter It embossing ink then embossed with Silver Tinsel from the Letter It pack.
  • "It's your day" inked with Ranger Letter It embossing ink then embossed with Recollections EP in Snow on some saved silver packaging
  • The pink glittery eyelash yarn was from Andrea at Snapping Monsters last year ;)
  • The rhinestones were from a pack my sister sent a few years ago now.

I'd like to share this with the following challenges:

Tuesday, May 22, 2018

SOS: ...April showers...

This week at Shopping Our Stash, we are singing the same ol' song: April Showers Bring May Flowers! How does that strike ya? Flowers?  Showers?

This is what I made:


I had to show the full view of the card  on the wall :) 

Supplies:

  • Distress tag inked with Antique Linen DI and sprayed with a mix of Heirloom Gold Perfect Pearls
  • The flowered paper is from a Tim Holtz pad, and this is my fave paper of all Tim Holtz papers and I have hoarded it for sure, cut to size and stitched around the edge.
  • I roughed up the edges with a Making Memories edger then sprayed it with Heirloom Gold spray
  • The grey flowers were cut with my newest flower die set (by Tim Holtz, surprise, surprise...), but with more Tim Holtz paper.  These were actually cut before I started this project by using up a scrap of paper from THIS project.  The flowers were just sitting on my desk.  I would not have normally chosen grey, but it worked!
  • Yellow flowers by Prima from Tuesday Morning probably 2 years ago-- definitely using these sparingly... happy with the way they look here.
  • Tim's Quotations stickers cut apart for the sentiment.
  • The string is yellow hemp from Hand Made Modern by Target.
See you guys over at SOS with your April Showers Bring May Flowers project!

Friday, May 11, 2018

This Happy Life

This was partially made a couple weeks ago, and I just unburied it and finished it this morning:


This will go to a friend of mine who is a biologist for Collins Pine Company, and her duties include the evening owl surveys.  I showed her this die when I got it and she LOVED it. 

Supplies:

  • Ranger Distress tag coated with Distress Stain in Broken China, Iced Spruced, and Peeled Paint
  • Tag then brushed with an uneven coat of Ranger Crackle Accents (FYI: I just get a new bottle and immediately take the tip off...)
  • After Crackle Accents dried, I scribbled the upper portions with Picket Fence Distress Crayon and the lower portions were scribbled with Walnut Stain Distress Crayon and rubbed into the cracks.
  • Owl cut with Tim's die on a scrap of brown paper and heat embossed with Ranger Potting Soil EP and Custer's Last Stamp EP in Pewter
  • Tim's Quotations inked with Frayed Burlap DI and cut apart, then touched with a little Glossy Accents for additional adhesion

I'll share this with Creative Artistes this month for Mixed Media, Anything Goes.

Thursday, May 10, 2018

Good luck butterfly tag

Here's this:


Supplies:
  • Background tag was made using all kinds of stuff...I am new the gelli-printing, and this tag has multiple layers of paints and stencils and stamped-on bubble-wrap and rubbed-on gold.  I mean, the thing is thick.  (FYI, generic acrylic paint, Distress paint, probably some gesso, and some Deco Art metallic lustre.)
  • That butterfly panel was made on a Canson Mix Media paper scrap
  • Butterflies stamped with Distress Embossing Ink and heat-embossed with Recollections in black 
  • Color Bursts added with Indigo, Orange, and Burnt Orange
  • The butterfly panel was sewn on with some black floss that was already on an awl on my desk
  • Yellow flowers from Tim's 2nd wildflower set, already cut from yellow scrap
  • "Luck" cut with Tim's diecut  from a scrap of black that was on my desktop
  • The tiny "good" is from Tim's chitchat stickers
  • Vintage seam binding from my stash 
I'll share this with the following challenges:

Monday, April 30, 2018

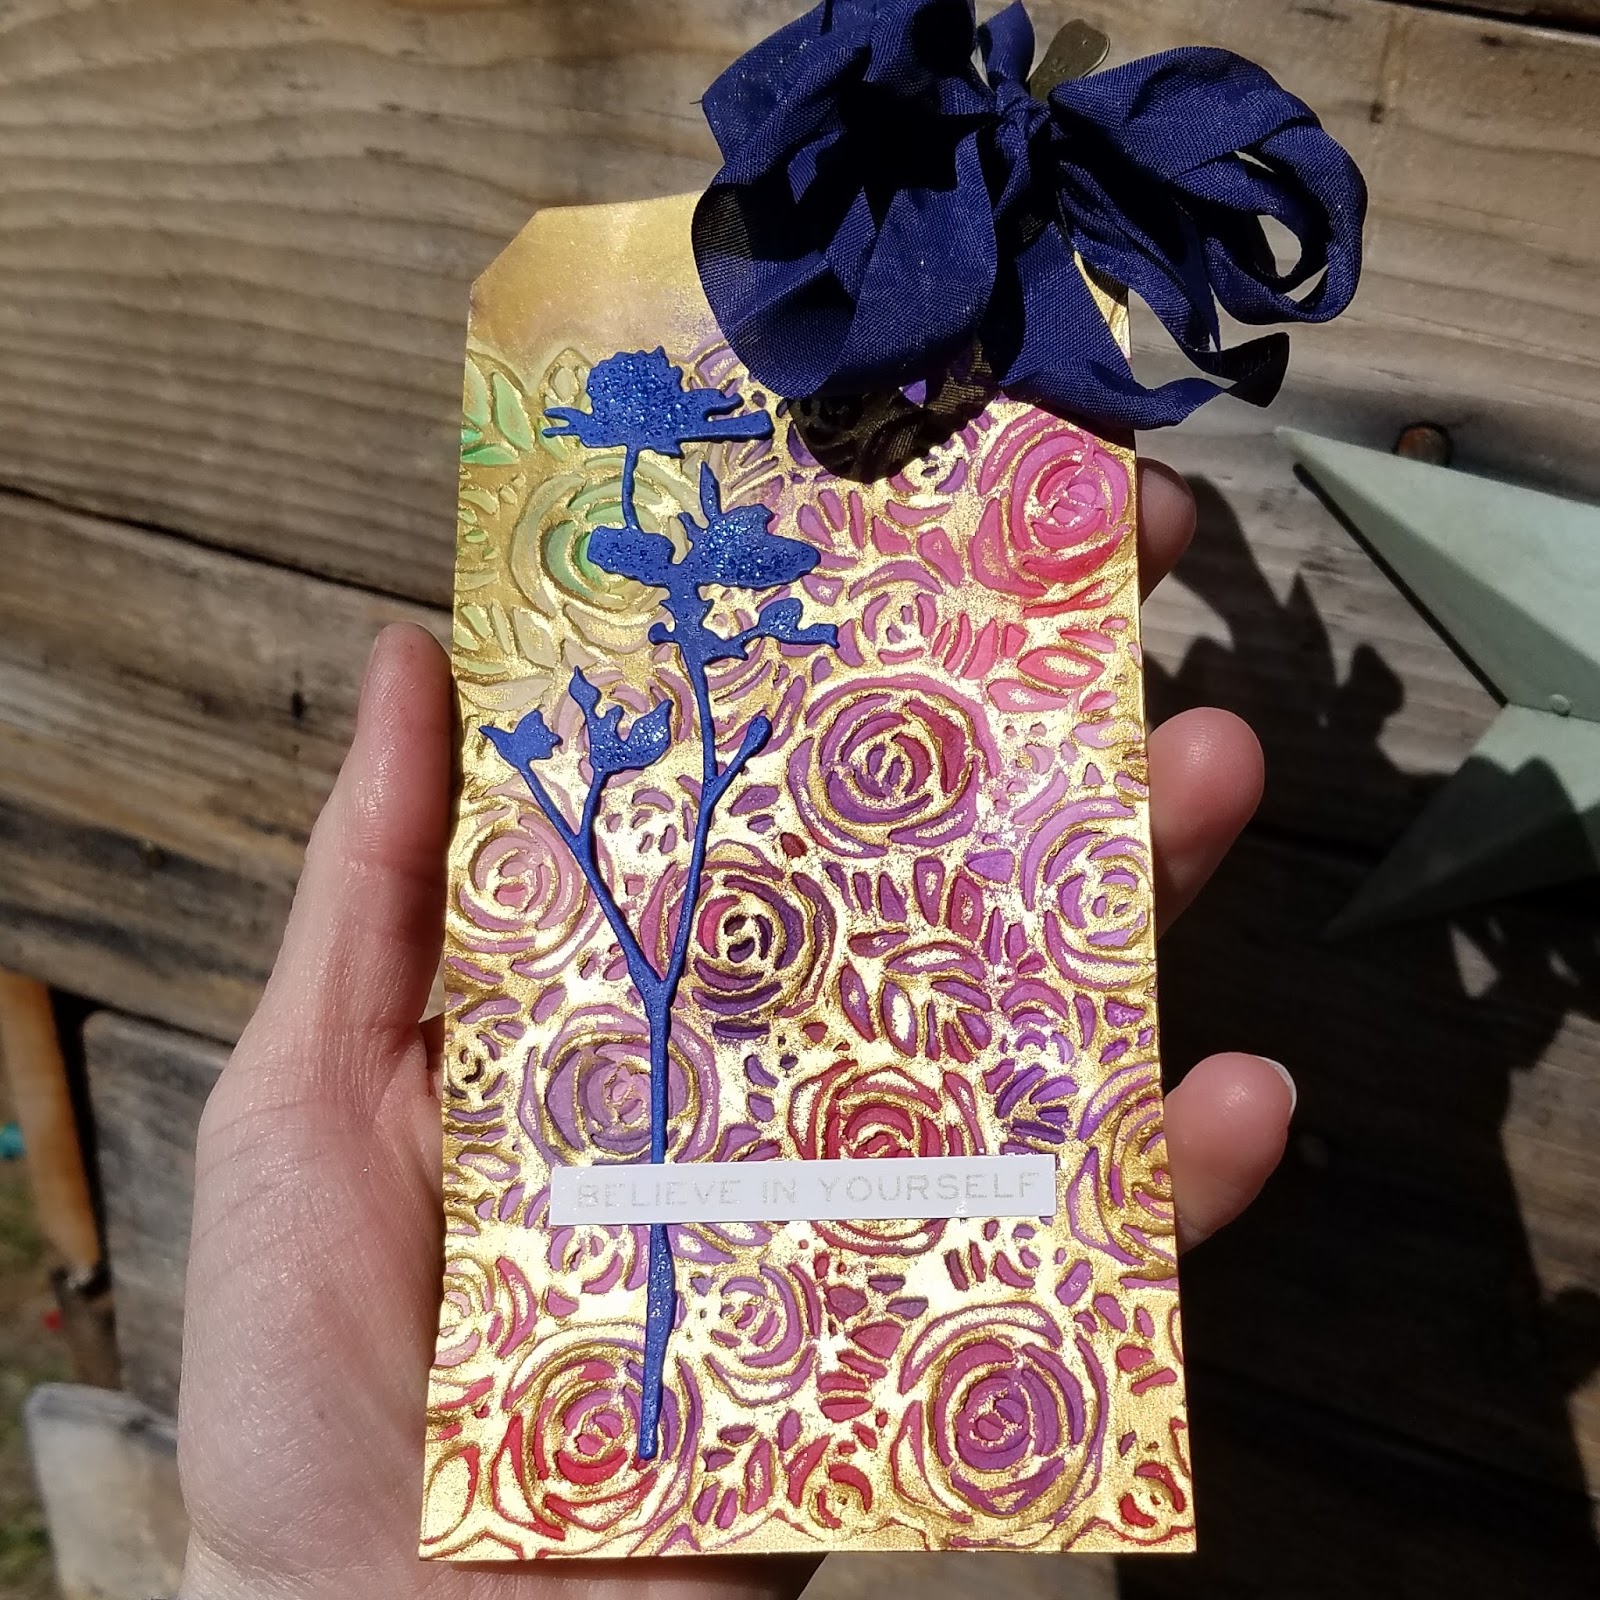
Believe in yourself!

Here's a tag that I finished up this morning:

The gold!!!


Supplies:

  • Ranger Distress tag embossed with Tim's Roses EF
  • Inked with Color Bursts in Chartreuse, Orchid, and Fuchsia (this is a fave combo of mine...)
  • DecoArt Metallic Lustre in Gold Rush rubbed all over the raised portion with my finger
  • The wildflower (die by Tim, set 1 I believe) was cut from a scrap of deep blue/indigo paper and embossed with a smidge of blue Stampendous EP
  • (This morning) I added the quotation (by Tim) with a little added Glossy Accents to ensure it sticks to the embossed paper
  • (This morning) The bow is made from vintage seam binding.  I roughed it up by spraying it with a mix of Perfect Pearls and heating it thoroughly in a little teacup!  I affixed it by pinning it with one of Tim's Ideaology pins.
I'll give this to a teacher this week... they are all ready for state testing, but some of them get anxious.  But they are awesome!

I'll share this glorious tag at the following places:


Christmas tag, no stamping

Was inspired by the current challenge at Merry Monday, and even managed to make the project appropriate for Jingle Belies!  Made this entirely this morning--often I work in pieces and finish things up as inspiration strikes, and in the interest of time-efficiency.  Not this one!  All in a moment of holiday inspiration!


I wanted to show the cool twine from my stash-- kept from a gift.  Normally, I might not keep red and white twine (ummm, 'cuz I have plenty...), but you can see the comparison above-- this stuff was kept because it is so nice and thick!

Supplies:

  • I scribbled Picket Fence Distress Crayon on a Distress tag, then (tried) to coat it with Distress Stain in Broken China.  Well, the crayon resisted as I'd hoped, but the stain pad was getting "gunky" from the crayon, so I kind of just dabbed it around and then sprayed with water.
  • After that, I went through a couple iterations of spritz-dry, which is how the awesome snowy scene was made!
  • The car is a sticker from Carta Bella from last year
  • The ground was cut using Tim's Home For The Holidays die set for the first time, as was the sentiment, both cut from scraps.
  • The golden "snowflakes" are actually from a Fiskars flower stamen punch, but they look like retro little snowflakes to me!
  • The twine was kept from a gift.

I'll share this tag with the following challenges:

Rise Above

These words will be my mantra this week as state testing begins!

Click for even better inky goodness!


I just tried to show how shimmery the tag actually is... sparkle is the craft-blogger's nemesis! 

Supplies:

  • Ranger Distress tag stamped with Inkadinkado stamps purchased over the weekend.  These are supposed to be used with some sort of "Stamping Gear" kit that allows you to arrange the stamps in an organized fashion, but I will be seeking no such kit.  Had a great time with them just on an acrylic block!
  • I inked the stamps with DOx in Cracked Pistachio, Peacock Feathers, Seedless Preserves, and Spiced Marmalade.
  • After I heat-set the ink, I use a water brush to blend the DOx.  This was fun to do and looked neat, but it was a little *too neat* for me.  I used my mix of Perfect Pearls and did multiple rounds of spray-dry-spray-dry for the wonderful inky effect we have now.
  • The Inkadinkado butterfly stamp was then added all over with Ranger Archival in Jet Black
  • I added Tim's quotation to the center and topped it off with some vintage seam-binding.