Monday, January 30, 2017

Bucephala

Here's my beloved Buca:


Miss her so much.  She was really much more attractive than this picture, but I did it from memory... normally I sketch from a picture but I didn't have any head-on pictures of her accessible that looked how I was picturing her... dogs and their personalities...

Supplies and notes:

  • I used the art journal I made from a Childcraft book in December.  Pages were coated roughly with white Liquitex gesso.
  • Dylusions sprays were applied through home-made stencils.  Some parts were dabbed with a baby wipe where the Dylusions mud was being made.
  • I sketched Bucephala (I called her Buca, pronounced "boosa"), with a Sharpie and accented with plain white chalk.  I have to note that earlier I started a project in a new small Dylusions journal, but it was a sad piece, so small... Buca was so big, so without even thinking about it, I oriented the Childcraft sideways to accommodate my lovely animal.
  • "Bucephala" was written with the Sharpie originally, but I went over it with black Liquitex gesso to make it a little more bold.  I thought about adding her birth and death dates (spanning 10 and a half years... a good long life for a mastiff), but I don't want to face that reality every time I see this... it's been nine months and I'm still grieving.
I was glad to make this-- good therapy-- for the current Simon Says Stamp On Monday challenge, "Pets corner."

Okay... here is the sad drawing I referred to earlier, but she's to cute not to share:

Sunday, January 29, 2017

Bright Birthday

Hello!


Supplies:
  • Stamps by 100 Proof Press, Hero Arts and Rubber Stampede
  • DIs
  • Faber-Castell Pitt used to doodle some dots at the edge of the panel (a photo mat negative) and for the sentiment. The fun banner stamp had some extra doodling, but the Ranger Archival in Jet Black matches the black of the Pitt so well-- plus I matched the line weight so it's hardly noticeable.
I made this a week ago and never posted it to it's intended challenge, but this is for the better since I haven't played with the folks at Seize The Birthday in ages...
The optional "toppings" are dashes and/or doodling.


A subtle nod to chickens

This was made quickly for a family friend battling cancer.  She has a cold, which is miserable on top of everything else she is going through.  This will brighten her day... I noted in the card that the feathers are a nod to her beloved chickens!


Vintage Bingo card colored wth Ken Oliver Color Bursts through a Julie Fei-Fan Balthzar feather stencil about a month ago-- well, this is actually a monoprint from that technique.  The beautiful diecut and embossed pearly-taupe feathers were a gift from Pia.  I adhered them using Elmer's spray adhesive.

I'd like to share this at Simon Says Stamp on Monday: Spread Your Wings... a reference to the fairly-flightless birds!

Forget-me-not

I needed a few sympathy cards and came up with these:


Very simple, no sympathy sentiment on front.  Just added the panels made a few months ago using old botanical bookplates watercolored with DIs.  They were affixed to background panels inked using DIs and Distress Spray Stain through a Prima stencil.

I really need to make about ten of these in one sitting... looking at them now, they are somber enough to convey any sincere note, but also have a natural and home-made warmth.

I'll share at Simon Says Stamp on Wednesday: AG.

Tuesday, January 24, 2017

SOS: All that glitters is gold

I'm here again for another Tuesday with Shopping Our Stash where we challenge participants to use neglected or unused items in their craft-stashes to create something!

This week, our selected theme is..

All that glitters is gold!

Although the common saying is "All that glitters is not gold," we are saying, "Sure it is!"

Use some glitter and/or gold on your project and enter at Shopping Our Stash.

This is my creation:


Supplies and methods:
  • This started on a panel made a few weeks ago using Dylusions sprays in After Midnight and Vibrant Turquoise, as well as some light blue+gold Glimmer Mist.  I believe the Vibrant Turquoise was sprayed though a Heidi Swapp polka-dot stencil, but it is very subtle and hardly worth mentioning at this point... because I added some water droplets and further obliterated the dots.  Moving on!
  • I recreated that original panel for a background panel, this time using my mini-mister filled with vodka for the splattery effect.
  • I planned to use the Recollections brads to adhere the panels together, but then I got all willy-nilly and started tacking brads across the panel.  It added a little more dimension across the the snowy sky.
  • The snowflake stamps (which are actually doilies... shhh) in the background are by Tim Holtz (won last year for a "12 tags" challenge) and Martha Stewart (many years old), all inked with Distress Embossing Ink and embossed using Stampendous Frantage in Shabby White.  The stamps that are fussy-cut in the foreground are by Handmade Modern (from Target... it's a set I bought for my kids a few years ago), inked again with Distress Embossing Ink and embossed with a glittery blue Stampendous powder.
  • The yarn is new to my stash, sent to my by the wonderful Andrea Ockey Parr... thank you! 
  • "Miss you" written with a Faber-Castell Pitt brush pen
  • The Tim Holtz Idea-ology nib was a late addition.  I had already inked it (maybe two months ago?) with Adirondack mixative in Gold, and when I came across it while looking for a little something, I thought, "That will be perfect for a 'miss you' card!"  
  •  To "up" the glitter factor, I used Mercuy Glass Stickles to casually edge both panels.
  • I matted the wintery panels onto some Tim Holtz craft-core metallic cardstock.  The smooth gold wasn't meshing with the project, so I stared at it for a minute before I busted out the Adirondack mixative in Pearl... added just the right effect!
Along with posting this for (hopefully) some inspiration at SOS, I'd like to also share this at Retro Rubber, where the current challenge is "Let it snow." It's only right to share there: they share a similar goal with us girls at SOS... use your older supplies!

Oh, man! I really need to vacuum the craft-shack!  All of the glittery embossing powder is going to melt to the floor in front of the heater!  Please go on and visit the rest of my DT-homegirls at Shopping Our Stash, and I look forward to seeing your sparkly projects over at the challenge page!


Monday, January 23, 2017

Get Better

Ahhh... playing with alcohol inks never gets old!

Here is a card made with two panels made during the same session:


Supplies:
  • Ranger glossy alcohol ink paper.  (Not a huge fan.  I need some Yupo.)
  • Richele Christensen's technique (HERE).  I have done similar techniques before, but I've never swiped my card through inks on my mat.  Check it out.  
  • Tim Holtz Tiles stencil
  • Adirondack alcohol ink in Butterscotch, Currant, Stream, and Oregano, mostly selected with my "grab blindly" method.  I specifically chose Butterscotch, though, to lighten it up. 
  • Letter stamps are Amy Tangerine and the butterfly is generic, both inked wth Ranger Archival in Jet Black 
  • Stitching created with a Micron 08
Happy to be crafting!  Been awhile!  On the day I did this (Saturday), it was my first playtime in a long time... I wasn't super productive, but let me tell you: I must have had serious withdrawels, because I used EVERYTHING... stencils, alcohol inks, Distress Paint, Liquid Pearls, Dylusions sprays, Distress sprays, stamps, embossing folders, crackles, gloss, embossing powders... like ALL THE STUFF.  It was very therapeutic.

I plan to share this at the following challenges:


Simple "Hello"


My craft time has been so limited, and though I always think there's an end to the hustle, somehow family life fills every cranny of time!

Girls are both playing basketball, my MIL has been unwell, my county is officially in a "State of Emergency" for weather, and I'm supposed to be going on a vacation of a lifetime this week... craft time? Haha, what's that?  (I started this post two weeks ago... update: MIL still unwell, kids still playing basketball, it hasn't stopped snowing, and I went on the vacation of a lifetime and wish my feet were still in the sand!)

I still haven't sent holiday cards to my craft-friends and DT peers. I'm so ashamed. Sorry, girls. (Another update: I spent most of Saturday filling envelopes for you guys!)

Anyway... here's the simple card as promised in my post title:


And here's a BONUS card made from monoprinting the remaining ink:


Supplies and notes:
  • A combination of Ken Oliver Color Bursts and Lindy's Stamp Gang Magicals were sprinkled over Tim Holtz's Tiles stencil then sprayed with high quality H2O (LOL)
  • The sentiments were painted using black Liquitex gesso
That's about it!

I'd like to share with Happy Little Stampers January CAS challenge:


Saturday, January 21, 2017

HLS January Christmas

Made this two weeks ago... only just getting around to photographing and posting it:


It was inspired by the Happy Little Stampers January Christmas Challenge:


Supplies:

  • For both the background and the "Joy" I used a combination of Lindy Stamp Gang Magicals and Ken Oliver Color Bursts
  • I used Micron pens for the doodled letters and background.  If you look closely, I also added triple-dots across the background. 
  • The word was popped up with dimensional tape, and that's it!

Tuesday, January 17, 2017

SOS: Fantastic Beasts!

This week at Shopping Our Stash, Alicia is hosting, and she has selected the theme of...

...Fantastic Beasts!
Use dragons, unicorns, monsters... you get the idea.

This is a great stash-buster because whether you are a fan of mythical creatures or just a craft-hoarder*, you will likely find something in your stash that has escaped capture-- er, uh, use.

Here is my Fantastic Beast creation:


Supplies:
  • *I assumed I'd be able to find fantastic beasts in my stash.  Uhhh... nope! Geez! I have a skeleton mermaid, but the power was out when I went to emboss her, so... nope.  Digging through my stash (frantically now), I found a pack of Colobok diecuts my mom sent me a few years ago... behold: a unicorn!  Thanks, Mom!  Castle also...
  • I made the background (earth and sky) with a combination of Lindy's Stamp Gang Magicals and Ken Oliver's Color Bursts. 
  • The castle's windows and drawbridge door were negative spaces, so I filled them with a scrap of Tim Holtz kraft-core metallic paper in gold.
  • The scene was matted onto some of Tim's kraft-core metallic paper also, and cut with a seldom-used blade on my paper cutter. 
  • I drew the banner on watercolor paper with a Micron (new to my stash-- a family friend sent me a pack of Microns for Christmas), then sprayed it with a pink and a blue Tattered Angeled Glimmer Mist
See you guys over there!]

Tuesday, January 10, 2017

SOS: *Stickle* me, Elmo!

Yep, you got it!

This week's challenge at Shopping Our Stash is to 
use Stickles (or a similar glittery product) 
on your creation!

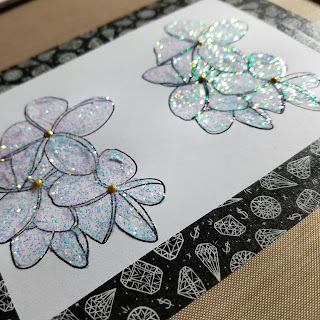
Here is my creation:
Beach-on-the-brain... my oldest and I are off to Hawaii on Thursday! 


During the drying... don't you love my Scotch tape?  So fab...

Just so you know... I only have a handful of Stickles.  I am always drawn to glitter ("Oooh... sparkles...."), but seldom bust out the glitter, including Stickles.  This was a great challenge for me because it certainly got me to bust them out and play with these neglected products!

Supplies and notes:
  • 7 Gypsies tag painted with the sponge tip of Distress Paints in Broken China and Chipped Sapphire 
  • Stickles in Ice Blue and Icicle
  • Ranger Liquid Pearls in White Opal and Gold Pearl
  • True Hemp twine
  • Plumerias are a stamp from Inspired by Stamping, stamped in Ranger Archival in Jet Black then taped down and "Stickled," and left overnight so they would hopefully dry flat-- they did.  I fussy-cut them and popped them up with dimensional tape.   
  • The tiny quote is from a damaged Nancy Drew mystery.  I clipped this months ago and looked through my clippings just to find it.
  • I added the crown last. It was "Stickled" (Mercury Glass) with another project in mind, but I had an irresistible craft-urge to add it, so I followed my craft-gut! (My husband said it gave it the "Ariel-feel..." love him!)
Thanks for visiting, and I really look forward to your entries this week-- I'd love some inspiration to use Stickles more often!

See you over at SOS for some Stickling good fun!

Tuesday, January 3, 2017

Aloha

Aloha!

Heading to Hawaii next week and was thinking I'd leave a card or two hidden at home for my hubs and youngest...


Supplies:

  • Mat panel (framing mat-- dimensional... this is the "my choice" element) stamped with Inspired By Stamping stamps in Ranger Archival in Jet Black.  Notice my fave detail: I also stamped the edges of the mat... looks so cool to me!  
  • The mat was then smooshed into some Mustard Seed DI inked onto the craftmat then dried. 
  • After the yellow, two rounds of Dylusions sprays were smooshed in: Funky Fuschia and Crushed Grape 
I will enter this at CAS Mix Up for January...

SOS: Shape up!

Happy 2017!

This week at Shopping Our Stash, we are encouraging you to create a card (or craft item) in a shape other than a circle or a square!

Here's what I came up with:


Supplies:
  • Heidi Swapp butterfly mask used to trace shape onto the card
  • Wings, banner, and heart cut from scraps
  • Stitching (... poor stitching...) on wings
  • Edges of pieces inked with DI in Gathered Twigs
  • Picture from one of Tim's 8x8 stacks.  I wiped it with some matte Collage Medium and daubed it with some thinned gold Adirondack mixative-- was going for the aged photo look with the metallic chemicals
  • The red tinsel trim came from a local store from the holiday section
  • Metal flower from an old BasicGrey collection, inked with some gold Adirondack mixative
  • Viva Paper Pen dots in Anthracite
  • Antenna are Wilton stamen inked with Adirondack alcohol ink in Mushroom
  • I typed the quote over a year ago... found it in my stash.

Looking forward to the inspiring projects you guys post... and speaking of inspiring, let's go check out what the rest of the talented SOS Design Team made using items in their stashes!

Here's to you guys!