Sunday, January 24, 2016

Girly-girl

I made this last Monday during my craft flurry:


This cutie will be entered into the current Curtain Call Challenge.

Supplies:

  • Studio 113 card base
  • Core'dinations cardstock in the background with a Martha Stewart heart stencil used with Picket Fence Distress Spray... which was difficult to photograph
  • Fine-tipped Sharpie for accenting
  • The image is from Chickaniddy paper... I don't know if I own any of their other stuff
  • Flowers from my stash with Wilton stamen., which I rubbed on an orange-shade Distress Ink pad
  • I drew the little scalloped bunting on a scrap of some of my fave American Crafts paper then just cut it out. This part looks very Snapping Monsters to me... just that part.  The rest on Andrea's stuff is 100x more unique than this :) But this is a cute birthday card and it will get used!

Wicked Wednesday: HEARTS

Awww, it's the time of the season for lovvvvinnnngggg...

Here's my ATC for Wicked Wednesday #193:


(The zoomed-out image is on the side of the craft-shack,,, it was too appropriate to not include the heart!  The siding of the shack is reclaimed siding from the old mill, and I kept the pulled nails and used them for little decorations :))

Supplies and notes:

  • Library card base, cut to ATC-size then made juicy over an afternoon or two of crafting
  • I frantaged the edge with Stampendous frantage in Shabby Blue
  • The gold spots are mainly Liquid Leaf in Classic Gold... I got a little "loose" with it and touched the cord (from my stash) also
  • The "love" stamp is one of Tim's... stamped in Color Box Coral
XOXO

SOS #235...

... has a good ring to it!


This is a little entry for this week's Shopping Our Stash challenge, 3-2-1: use three of somethin', two of somethin', and one of somethin'!

Supplies and notes:

  • This is a sister card to THIS ONE... I'm brand-spankin' to the die-cutting world, and I couldn't bear to toss the negative pieces!  So this card was created as a bi-product, and I couldn't be happier with the efficiency of this process!
  • Paper is DCWV cardstock and We R Memory Keepers gold-striped vellum
  • THREE sequins
  • TWO banners
  • ONE die-cut
Pia had noticed "1, 2, and 3" of something on the sister card, and I had already pegged this card for this challenge-- she is half-way around the world and she was on my wavelength!

I'm thinking I could use this as another baby card on my long list-- then I'd be done with five of seven!

Sunday Stamps

Here's an entry for Sunday Stamps Sketch #118 that I did yesterday morning:


Here's the sketch:

Supplies:

  • Card baserved from Autumn
  • Flower die-cut from a Simple Stories pack
  • I drew the white line with a Zig Emboss Writer and used Recollections embossing powder in Snow
Simple and cute, right?  I ought to make a few more...

Color Throwdown & Cupcake Inspirations

Here's a quick entry for Color Throwdown and Cupcake Inspirations:


These are the challenge graphics, for your reference:


Supplies:
  • We R Memory Keepers gold-striped vellum
  • Taylored Expressions "joy" die
  • Sequins 

Friday, January 22, 2016

Rockin' around...

...the xmas tree...

This is another little creation I made last weekend and it got lost in all of my activity:


I had intentions of creating along with Jingle Belles all 2016, but it hasn't happened... but, I will try!  This tag is for the Jingle Belles Oh Xmas Tree challenge.

Supplies:
  • Library card base with smooshed Distress Ink backgound
  • K & Company DP for the trees
  • Stickles around the trees and edge of the card
  • Wood stars from Studio Calico
  • I added Liquid Pearls in Rose Quartz for "snow"
  • The bow is vintage seam binding that was stained over a month ago and not used,  It was the perfect addition to this girly-fun tag!

STAMPlorations

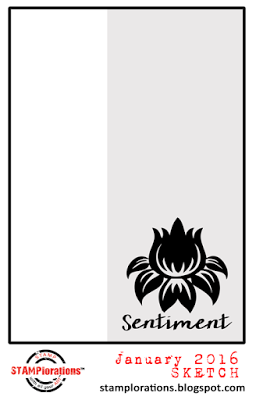
I made this last weekend during my flurry for the STAMPlorations Sketch Challenge, though I did not go with the CAS theme...well, this is pretty CAS for my taste, but still...


Add caption

Supplies and notes:
  • The card base came from Autumn :)
  • The stenciled panel at right is Frayed Burlap Distress Ink and Dried Marigold Distress Ink over a Tim/StampAnon Tiles stencil
  • The stamp (named Kelly Jo) is Hero Arts stamped in Crystal Ink in Chocolate Brown
  • I wrote the sentiment in a gel pen received from my sis for xmas
  • I rounded the corners last with a Fiskars punch... I had always pictured this card with rounded corners, so at the end I was like, "Wait... this is missing something..." (snip, snip...)


Dutch Lovers and Clear It Out

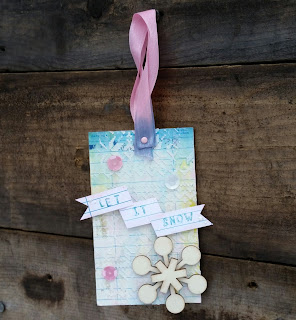
Here's a wintry tag that's  been in the works for over a month...


This was another project that began as a "playing card"-- like, I was just messing around.  Now that it is a complete project, I will enter it into the following challenges, both of which inspired a wintry-make:


Supplies:

  • Library card base with Broken China and Peeled Paint Distress Stains
  • Tim Holtz StampAnon Holiday Knit stencil with Theresa Collins Modeling paste.  Once dry, I wiped my finger in some Spun Sugar Distress Paint and rubbed it heavily over the card.
  • The woooden snowflake was built using Handmade Modern (from Target) wood pieces
  • The sentiment was written out on strips of a library card with some old letter stamps from Target dabbed in Broken China Distress Ink.  After the words were cut how I wanted them, I quickly dabbed them with Spun Sugar Distress Ink
  • The seam binding is old but not vintage-old... I dipped the end into Broken China Distress Stain and fixed it with a pink brad
  • Scattered a few sequins, and voila!


Simon Says Wednesday and Try Stampin'

Ahhh... another baby card!


I think this is my fave yet.  After this one, three more to go!

I plan to enter this into the following challenges:


Supplies and notes:

  • Watercolored background from a recent session; I used a Heidi Swapp polka dot stencil over it with Scattered Straw Distress Ink.  I then cut the watercolored outline out along with the line... I'm very happy with this look
  • The cute little whale is from a die-cut pack by Creative Imaginations from a few years back
  • The netting is from a xmas gift's wrapping... it is plastic.  It actually has silver woven into it, but I pulled the silver out for this piece
  • I found the quote online and typed it with my old typewriter on 110# cardstock, then after I cut each set of words out, I inked them with Broken China and Scattered Straw Distress Inks


Monday, January 18, 2016

Tim's 12 Tags...

Okay, I went for it...

What creative person isn't inspired by Tim Holtz's creativity and innovation?  I mean, really. I can't imagine the person who could dismiss this guy's impact on the crafting world.  Between Tim and his obviously fantastic marketing people (Smoke and mirrors? Probably, but I'm guessing the smoke is cigarettes and essential oil vapor, and the mirrors are  mercury...), I think they've really made materials and techniques so accessible to the common folk-- not just cool supplies found only in warehouse-like college art classes.  I am not patronizing... just giving my honest assessment.  The craft world has benefited from Tim and his people.

So, because I am a huge user of Ranger Distress products (which I often refer to as "Tim's"), I think I will get jiggy with The 12 Tags of 2016 this year.


So, this year, Tim decided to get a little jiggy himself, and is doing this "remix" thing... oh yeah... who's feeling the R. Kelly?  If you click on the link above, you can read all about the madness behind his methods, but basically he's revisiting old tags and combining techniques and products from the past with new techniques, products, and/or perspective.  

Here's the remix graphic:


While Tim's tag is naturally fab, I'm not gonna lie: I like these two styles separately but I am not really feeling the remix. I gave it a go, though.  


Supplies and notes: 
  • Well, for this project, I actually didn't have a lot of the supplies on Tim's materials list... so I absolutely went with the spirit of the challenge and used what I had to achieve the same effects!  It was a very satisfying project in that way!  And one more comment: I have Disney on the brain, and I kept thinking "Tower of Terror" as I went industrial... you know, the service elevator... :)
  • For the base layer, I used a library card (as I do 96% of the time), and I dabbed Distress Embossing Ink over the familiar Tim/Stamp-Anon stencil and embossed with Custer's Last Stamp EP in Pewter.  (I do not own foil tape, and I am only brand-new to the world of an embossing machine... this was my method for the industrial background.)  Once cool, I painted it with Black Soot Distress Paint-- just swiping broadly for one pass,  After that dried, the entire thing was edged with Distress Stain in Brushed Pewter.  Pretty bright, but later I toned it down by daubing with Rusty Hinge Distress Ink.
  • Next, I went for the "chalk" layer.  This took some thinking and experimenting.  I tried Tim's method, but really, you do need that rough-stuff (the EP with teeth).  So, my technique was this:  I stamped my image (from 100 Proof Press... love this... this is how I feel by the end of a long library day...) in Distress Embossing Ink and added my "dirty" clear EP from Custer's Last Stamp.  (Does everyone have a "dirty" clear and a "primo" clear EP container??? I do...) I did this all on 110# white cardstock.  Then I painted over the entire thing with  Black Soot Distress Paint.  After that, I sprayed a little Picket Fence Distress Spray Stain onto my mat and used my finger to edge it and smear it a little.  Looks pretty good, no?
  • To attach the two panels, I busted out my Crop-O-Dile and gromlets... OMG, haven't used that thing for anything but punching in YEARS.  REALLY.  So it was fun to go into my old orange case and check out the baggies of gromlets and eyelets.  Actually, I did some eyeletting while I had the case out... fun, fun.
  • For the attaching element of my tag (you know, a tag must be attached to an item somehow...) I went with some hemp twine with black metallic thread woven in. Just a single strand, thank you.  The charm was fun: I used an old heart charm from BFF's first wedding's crafts and dabbed it into Tim's Embossing inkpad, then heated the thing up, then added Aged Silver frantage by Stampendous and heated again.  The pin is Tim's, too.
  • I needed something for the lower corner to balance the tag, so I cut a couple number strips from library catalog cards and dabbed them first with Gathered Twigs Distress Ink, then misted and par-dried.  After that, I edged them in Black Soot Ink and dipped in water again.  I attached them to the base with a staple pre-inked with Rust Adirondack Alcohol Ink.  This didn't yield the aged effect I was looking for, so I them added a drop of Rust to the mat with a drop of blending solution and mixed with a tiny paintbrush and painted near the entry holes of the staple, as well as accented all other metal parts of the tag.
Lots of typing... lots of thinking!  I am now looking forward to perusing the other entries for January to see how folks achieved similar results.

Sunday, January 17, 2016

Blue jay

Look familiar?:


Supplies and notes:

  • The brother card to this one was so fun to make, and I love the stamps so much, I took a break from baby cards and made another one of these!
  • All stamps are Papertrey Ink Winter Woods
  • Branches stamped with Crystal Ink is Chocolate Brown
  • Berries stamped with Color Box Ink in Coral
  • Bird stamped with Crystal Ink in Royal Blue; details with MementoLuxe in Tuxedo Black
  • Sentiment also stamped with MementoLuxe in Tuxedo Black
I love the coral berries and the blue bird... so aesthetically pleasing!  

I really didn't make this for a challenge... and there aren't many Anything Goes going on... how about I share this, just to share it?  :)

Baby-love... baby card three of seven...

How about this for another baby card?  Thought I may as well blog all these baby cards at once so you people see I really gave it a good shot (a good shot today... I still have four more to make!):


Supplies and notes:

  • The baby and banner were cut/ made from Bella paper, all edged with ColorBox Chalk in Creamy Brown
  • The metallic hemp is from True Hemp
  • Pearl accent on the banner are Liquid Pearls
  • Faux-stitching on the baby image was drawn with an ultra-fine Prismacolor pen
  • "Joy" was stamped with little alphabet stamps I got from Target years ago.
I will enter this baby (uh... haha...) into the current STAMPlorations CAS Challenge... the optional color twist is SILVER... silver is woven into the hemp twine :)  BOOYAH.


Share *more* joy...

Here's another baby card made using the current Share Joy sketch:


This card was made for another of the multiple coworkers, friends, and neighbors I know who are expecting babies soon!  I had  a certain teacher in mind (another first-grade teacher), but now when I look at it, I keep thinking maybe this will go to my neighbor, who just found out she is having a boy.

Here's that sketch (which I flipped a bit):

Supplies and notes:

  • While this paper is mostly blue-tones, I tried to neutralize it by watercoloring some yellow and green over the blue bows... I think it was a successful move, but when I think about giving to someone expecting a girl, they might just see boy, hence thinking I'll pass this one to the neighbor.
  • The paper with the babies and storks is Crate Paper, but I only had a scrap of the nursery rhyme background... not sure who made that.  But it's super cute.
  • Wilton doily
  • Bow button with shank removed from my stash
  • Blue paper for banner is DCWV stack paper
  • I faux-stitched everything with an uktra-fine brown Prismacolor pen
  • I edged everything with Color Box Chalk in Creamy Brown
  • Those little embossed corners are from Recollections, I believe.  They are one of those items that has been in my stash forever.

Share Joy: It's a Boy!

Literally 40% of the female teaching staff is pregnant right now,  and we only have one male teacher... it's crazy. Here's a card I made for the first teacher due:


I used the Share Joy #18 sketch (below); I think the scalloped edges said "baby" to me.  This card is sort-of eclectic, but I like it.  It looks vintage-ish to me, and all of those primary colors and letter cards evoke an elementary school vibe.  This card was made specifically for a first-grade teacher who is having her first bambino.


Supplies & notes:
  • October Afternoon DP, Crate Paper DP, Marion Smith Designs DP
  • October Afternoon button
  • Target twine
  • Simple Stories alphabet stickers
  • Color Box chalk in Blackbird 
  • Pen-stitched the October Afternoon star paper with a Uniball that was in my desk
  • Viva Paper Pearl accents in Anthracite

Seize the Birthday

I have not played with Seize The Birthday in a long while.  Here's my entry for their current CAS challenge:


Supplies and notes:
  • This card exists because I was busting out some baby cards (not my fave type of card*), and as I was making a window-card for an expectant mother, I had a light-bulb moment: I thought, "Hey, I want to play with my new PTI stamp set!  Not  baby paper!"  So that's what I did.
    • *I am actually liking baby cards better now that I've made three of the seven I need... I grabbed all my baby-ish stuff and it is actually more fun than it was when I started.
  • Anyway, for this card, I used a Studio G card base
  • Stamps are all Papertrey Ink Winter Woods
  • The cardinal was stamped first with Color Box Archival in Blossom, then the details and sentiment were stamped with MementoLuxe in Tuxedo Black
  • The branches were stamped with Crystal ink in Chocolate Brown and Moss Green
Cute, huh?  It's CAS, but it also has extra fun inside!  I will definitely be making more like this!


Homage to Wicked Wednesday

If anyone read the latest post at Wicked Wednesday, you'll see why I want to pay my respects... that sounds kinda final, but it's not.  I just like people who stand up for themselves and say what they think!  It deserves respect always, but certainly in cases of right and wrong.  Ethics are important on any scale.

So here's my ATC for challenge #192, making it sparkle:

Supplies and notes:
  • Library card base covered with Brushed Pewter Distress Stain
  • Letter stickers from Glitz Design
  • Stickles in Black Diamond
  • The Sequin trim came from the thrift store... it had been ripped off of some no-doubt fabulous dress-- the remnants of the original garment was evidently red silk!  Ha!  One can only imagine...but it appears to be very old
  • Jewels came from my sis for xmas

Heart with wings :)

How about this for a little piece of art to share?


Supplies & notes:
  • Library card base,  cut to ATC size,  then stenciled with Ranger Transparent Texture Paste through a Tim Holtz Honeycomb stencil
  • Once dry, card was smeared with the following: Mermaid and Rust alcohol inks, Gold mixative, and some blending solution, all Ranger
  • The wings stamp is from Invoke Arts stamped on MementoLuxe in black 
  • The crown was slightly inked with Mermaid and Rust alcohol inks. It was purchased in the "buy me while you're standing in line" bins at Michael's in late December
  • The brad is Recollections 
  • The heart was coated with Gold alcohol ink mixative. The heart itself came in a box of hundreds of blinglets from my sis for xmas... it was a gift to me and my kids :)
  • The quote was added last,  typed on the ol' typewriter and inked with (I believe) Rusty Hinge Distress Ink and water
Before giving away, I will enter this into the following challenges:
If you love the background of this, I did it the same day I made THIS.  

Here's to Sunday crafting!

Another creation born of experimentation!

And here is the second-to-last piece left of my crazy 45 minutes of experimenting with the new-to-me Cuttlebug from Autumn:


Oh, I hope I'm making her proud! ;)

I'll enter this into Simon Says Stamp on Wednesday: Ombre.

Supplies and notes:
  • I ran some sheet music (about 100 years old, not exaggerating) through with a cool embossing folder
  • I created a puddle on the mat with Aged Mahogany,  Tarnished Brass,  and Spiced Marmalade Distress Stain plus water and let the paper go for a quick dip... oooooh... ahhhhhh...
  • The little text is from a stamp set from Autumn by Heartwarming Vintage/Crafty Secrets. It was stamped onto a piece of a library card,  and it,  too, took a little swimmy-swim
  • The "joy" is from a die from Taylored Expressions, received with my Grumplings stamps (which I need to use more often)
  • For the card,  I just slapped it all on the kraft base. Boom. Oh, wait: before I slapped everything onto the card, I washed it with Antique Linen Distress Paint. 

Saturday, January 16, 2016

Word Art

This is a card for Crafty Catz #307: Word Art:


Supplies & notes:
  • I painted this as I was playing with my watercolors the other day.   I liked it enough that I thought I'd keep it... can't hurt to have extra birthday cards, right???
  • I added bling from Recollections 
  • Used a Fiskars corner punch 
  • The card base cane from a pack from my blog-friend Autumn :) The bright blue is really appealling to me right now,  and I'm totally feeling it with the yellow gold

Sketch Saturday & Creative Corner

Here's a "bonus card" that resulted from the maiden use of my new Papertrey Ink stamp set:


This will go in one of the girls' lunch bags. It's tiny, like maybe 2.5" x 4".

I used the sketch from Sketch Saturday this week-- Sketch #395:


Along with Sketch Saturday, I will enter this into Creative Corner Challenges: Feathers.

Supplies and notes:

  • Again, this was made using my first scrap-card of the new Papertrey Ink Winter Woods stamp set.  I put myself on a craft-shopping moratorium for the month of January (just trying to save my pennies for Disneyland!  I want to be eating about 4 churros, 3 corndogs, 2 starbucks, and a turkey leg a day... gonna cost some bank...)  So anyway, I cheated on my budget plan because I got an emailed notification that this PTI stamp set was back in stock.  Okay, so as a bird-nerd, I've wanted this for months.  I love fantasy birds, but these are actual species with accurate markings.  Ummm, I pretty much need them in my possession.  While we don't have cardinals and blue jays where I live, we do have black-capped chickadees in California, and they are my fave.  (Well, if a birder is reading this, we actually have mountain chickadees where I live, but the black-capped are just down the hill a thousand feet.)  Anyway, love it.  Worth all the guilt I have about purchasing these.  Feel so guiltless, I may also purchase all the dies that go along with it, thanks to Autumn, my die-cutting enabler.
  • Anyway, for this "test", I used ColorBox ink in Glacier Lake and black MementoLuxe.  
  • I sketched the box with a Uniball that was in my reach.

Under the sea...

Hello!  Here's another creation made after Autumn sent me the treasure chest (see this post):


Supplies and notes:
  • I ran a library card through the Cuttlebug in a Darice folder-- both from Autumn.  This was done on my first session with these goodies... 
  • The following stains were used: 
    Iced Spruce, Brushed Pewter, and Vintage Photo
  • The acetate oceanlife pictures were from an old K & Company set. They have a terrific copper sheen to them. 
  • I added drops of Mod Podge Dimension Magic to look like little bubbles
  • Oh, I also edged the card with Gathered Twigs and another green inkpad... the name escapes me at the moment.
  • I've had terrible luck with cheesecloth... I've tried it alone, with paints, with glues... with blah results.  The netting here is a wonderful alternative!  It was a sort of ribbon on a present, and it had silver strands woven into it.  I cut a piece, pulled out the silver strands, and glued it to the back of the card with Mod Podge.  As I was trying to speed the drying of the glue with a heat gun, I discovered that it was melting the plastic in an awesome way.   I had to stop myself before I reduced it all to a little toxic plastic glob... but it's so fun to watch it curl and melt!
I plan to enter this into the following challenges: